Showing posts with label tutorial. Show all posts

Monday, March 21, 2011

Tiddly Inks Tutorial!

I put together a tutorial this week for Tiddly Inks on two techniques I use to create shaped cards...

Style 1: Creating a hinged card

1) Taking a folded card (any size) and using a die cut, slightly overlap the edge of the creased fold...


2) Run it through the die cut machine & voila! You have a shaped card :)


3) Finally.. decorate & embellish your card and you're done :)
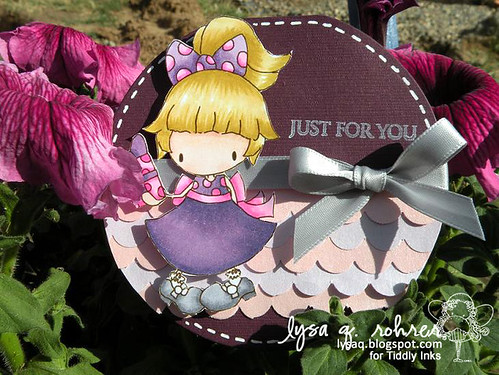
Just for you Annie
Supplies:
- Annie w/present (Tiddly Inks); All Occasion messages (Hero Arts)
- Circle nestabilities
- Scallop border punch (Stampin' Up!)
- Ink: printer, Frost white colorbox, Uniball signo white gel pen
- Copics: {hair} Y21, Y23, Y26; {skin} E000. E00, R01; {clothes} BV13, BV17, RV02, RV04, RV06
- Other: ribbon,

For those of you that don't want that flat edge where the card folds, here is another technique I use...

1) Die-cut 2 shapes of your choice


2) Take one of those shapes and using a scoring tool, score a line about 1/2" on one side


3) Fold on the score line and add adhesive to that 1/2" space


4) Place the other die cut and press firmly to adhere the two together, and now you have another shaped card!


5) Again, decorate & embellish...
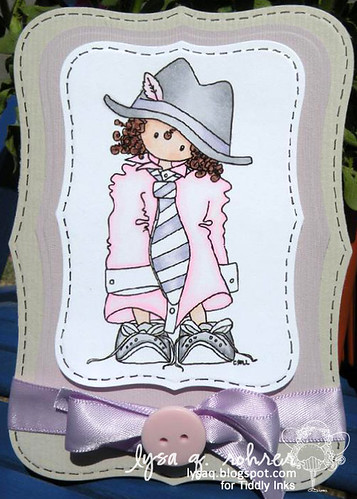
All Dressed Up
Supplies: 
- Daddy's Girl (Tiddly Inks)
- Labels 1 nestabilities
- Ink: printer
- Copics: {skin} E000, E00, R01; {hair} E25, E29; {clothes} RV0000, RV00, RV02; BV0000, BV00, N1, N3, N5; multiliner
- Other: ribbon, button

These cards were "inspired by" the fun colors in this photo


Check out the details for the challenge and the for both of these card on the Tiddly Inks Challenge blog!


Wednesday, June 23, 2010

My FIRST Video!!

Hi again! (Please see my first post today HERE for The Greeting Farm's Scrapbook layout challenge!)

After many requests, I finally gathered my courage to make my FIRST video to show you all how I color "shiny" black hair!  I came up with this technique by watching and incorporating ideas from all the talented designers out there...  {FYI: I am not copic certified!}

Enough chit-chat please enjoy my first video!

If you have problems viewing the video, please try HERE for it directly on Youtube.

The image used in the video is from Tiddly Inks, you can get her here!

Thanks for watching- Please let me know if you have ANY questions!

Monday, February 8, 2010

Joy Fold Card

Happy Monday!!

It was my turn again to host the Method Monday over on the InStyle Stamps blog.  You may remember a few weeks ago during the last blog hop, I made a this Joy fold card.  I decided to do a tutorial of it show you how I did it! (the original tutorial was from SCS.)

The Supplies:
- (1) 4.25" x 8.5" piece of cardstock
- (1) 3" x 8" piece of cardstock
- (3) 2.75" x 4" pieces of patterned paper
- (1) 4" x 5.25" piece of patterned paper
- Misc. embellishments

Step 1: Score the 4.25"x8.5" piece of cardstock at 5.5" to create the card base.


Step 2: Score the 3"x 8" piece of cardstock at 4".


Step 3: Adhere the 4"x5.25" piece of patterned paper to the inside of the folded card base, and one of the 2.75"x 4" piece of patterned paper to the outside.


Step 4: Adhere the other two pieces of 2.75"x4" pieces of cardstock to the inside & outside of the folded 3"x8" cardstock.


Step 5: Adhere the smaller folded card to the inside of the card base- be sure the flap opens to the right.


Step 6: This step is optional if you want to add something to secure the card from opening. Add an embellishment of stamped image (or anything) with dimensional adhesives on one edge (shown w/arrows) to overlap the corner of the folded card.


Step 7: Embellish & complete the front of your card, I used adorable Marissa.
(Sorry for the bad lighting- I'll have to retake the picture when I have some daylight!)
Joy Fold card

& Here's another view of it open.

Details:
- All patterned paper by My Minds Eye.
- Ink: Printer
- Copics: B0000, B91, B93, E000, E21, E44, E49, YG03, YG06, YR04. YR07

Hope to see you give it a try!!

Monday, January 11, 2010

Valentine Treat Holder

Hi there!

It was my turn again over on the InStyle Stamps blog to host Method Monday!  Last year, I had made these cute candy bar Valentine's Day treat holders & decided to show you how I made them!

The supplies you'll need:

- Scor-Pal (or any scoring tool)
- 1 sheet of cardstock 4" x 9 1/2"
- 1 sheet of cardstock 6 3/8" x 7"
- Colored image (Gidget)
- Ribbon
- Strong adhesive (I used red-line tape)
- Embellishments

Step 1:  With the 4" x 9 1/2" sheet of cardstock, Score along the long side at 6 1/2" & 6 3/4"
(hint: if you use Scor-Pal, place the edge at 1" and score at 4" and 4 1/4")


Step 2: Now turn the cardstock on the short side, and place the edge at the 3 1/2" mark & score at 4" & 4 1/4" and do the same to the other side


Step 3: Trim away the edges along the long end- as shown here

Step 4: Fold along score lines


Step 5: Glue the flaps around the back


Step 6: Set the pocket aside- with the other sheet of cardstock, along the 6 3/8" side score 3" on both sides


Step 7: Fold on score lines, adhere pocket & decorate!


Step 8: Finally- Decorate the front!
Valentine's Gidget

Gidget

Thanks for checking out my tutorial!

Monday, December 7, 2009

ISS Method Monday- Treat bag holder

Hello again!  It was my turn over at ISS to host Method Monday.   I made this super easy treat bag holder- I got my inspiration from a similar one that the fabulous Jennifer McGuire had made awhile ago for Hero Arts.

So here we go!  First- the supplies
- 4"x12" piece of card stock
- Patterned paper
- Colored image (I used Jana)
- Scoring tool (i.e. Scorpal)
- Circle punch
- Cellophane bag
- Ribbon
- Treats!


With the 4"x12" card stock, score at 2", 6", and 8"


Fold along those score lines and add some adhesive on the 2" flap


Fold and adhere the flap to the back


Using a circle punch (I used a 3/4" but any size will work) punch a hole in the center


Fill the cellophane bag with treats, twist the end and put it thru the hole you punched, and tie with ribbon


Decorate the front & you're done!

Supplies:
- Jana (InStyle Stamps); Good Cheer (Hero Arts)
- Labels 3 nestabilities
- Inks: printer, Versafine Onyx Black, Copic markers
- Other: buttons, ribbon, gems

Thanks for stopping by!!

Monday, November 16, 2009

Easy-peasy Easel Card!

Hi there! 

I can't believe it's been a week since my last post!  Things have been a little hectic the past few weeks and I haven't been able to spend as much time as I like to at my craft desk...

But was happy to be at it again since it was my turn over on the ISS blog again to host the Method Monday! I'm not sure about you- but I was noticing a little trend of EASEL CARDS popping up on multiple blogs recently- I thought they were the coolest thing and just had to give it a try.. and it's SO EASY!

Here is the card I made, and check out the tutorial here
Easel (front)

Easel (side)
Suzette

Check it out- if you look over at my sidebar you'll notice a link only for the month of NOVEMBER for an instant 5% discount off your purchase and InStyle Stamps!! Go quick.. there's only a few weeks left!!

Monday, October 12, 2009

Tea Time!

Hello & Happy Monday!

It was my turn again over on InStyle Stamps to host Method Monday! This week I chose to make this super cute teabag holder I saw here. It makes a great little gift or even a sweet invitation to have your best buds over for some tea!

So here we go!
Supplies:
- 5″x 11″ cardstock
- 2.25″ x 11″ strip of patterned paper
- 2- 3.25″ square pieces patterned paper
- Strips of cardstock for border punches
- Border punch (I used one from Martha Stewart)
- Adhesive
- String
- Colored image


Step 1: Score 5″ x 11″ cardstock along the long side at: 3.5″ and 3.75″ from both sides.

Step 2: Adhere patterned paper to bottom edge.

Step 3: Punch border from strip of cardstock.

Step 4: Adhere to top edge of patterned paper.

Step 5: Add border punch on 3.25″ squares.
(Note: you can alter these squares to fit the size of the tea bag)

Step 6: Adhere to inside on middle and right panels.

Step 7: Insert teabags.

Step 8: To close, fold right panel in towards center.

Step 9: Tie closed with string & decorate! I used Sitting Ava, she’s just the perfect fit to sit along the top of the patterned paper!Tea Time!

Going along with the paper-piecing theme from my previous post- I printed to Ava's and layered her dress to add some dimension- you can see it here if you look closely :)
Ava up close

Be sure to check out the InStyle Stamps store- there's a SUPER SALE going on!! Selected digis are only $1 and Stamps are $3!!! Go check it out!!!!

Thanks for coming by and happy shopping! :)