Showing posts with label LDRS Creative. Show all posts

Sunday, April 16, 2017

Blooming Great Day!

Happy Easter!!

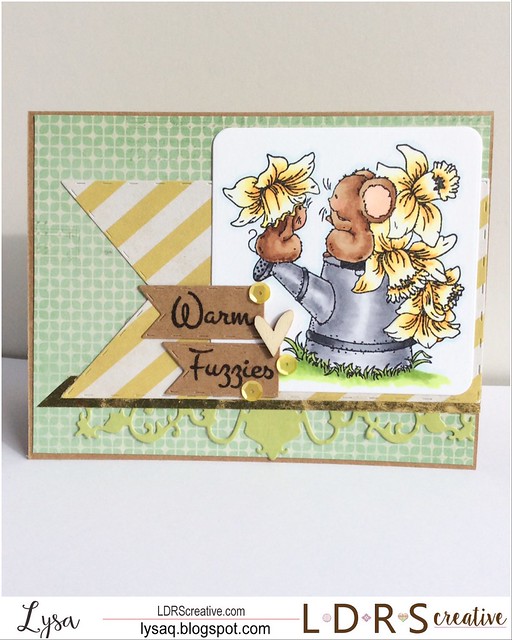
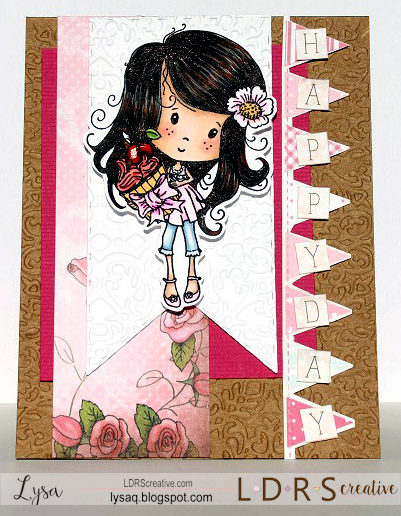
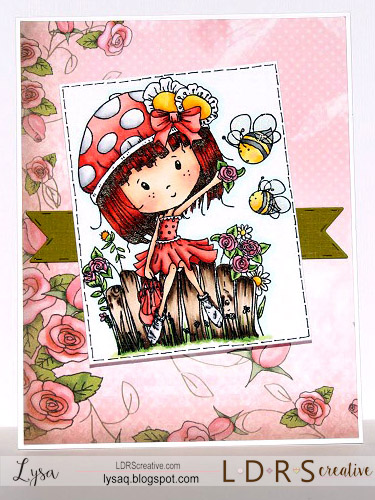
I'm on the LDRS Creative blog today sharing my card using these adorable Garden Bunny stamp & die set along with the new circle dies from Creative Basics!

Blooming great day

After coloring my image with copics, I die cut the image and coordinating patterned papers from the Soft Blush & Eleganza paper packs using the circle dies. I adhered them to my card base that I had embossed using the Picnic Quilt embossing folder. Finished off my card with washi tape, some wood veneer embellishments, sequins & twine!

Hope you had a BLOOMING great day!

Thursday, March 30, 2017

Time for Coffee!

Hello!

I'm on the LDRS Creative blog today sharing a card I made using the newest release from CHA!

...and it falls along with the Spring Coffee Lovers blog hop!!


Here is Time for a Coffee Break...

Time for coffee


I colored with Copic Markers and layered my image with Creative Basics dies:

- Basic Pierced Ovals

- Basic Stitched Flags

- Fancy Rectangles & Layers

I also embossed the patterned paper on my card base using a Majestic embossing folder, and as usual embellished my card with coordinating twine & sequins!

Hope you take the time to enjoy a coffee break!

Wednesday, March 15, 2017

Sweet Birthday Wishes

I'm on the LDRS Creative blog today sharing a sweet birthday card featuring Sweet Like Cake & Creative Basics dies...

Sweet Day

Colored with Copic Markers, I paired it with coordinating patterned papers and the following Creative Basics dies: Fancy Squares & Little Things, Fancy Rectangles & Layers, & Basic Stitched Flags

I layered all the dies together added the yellow patterned border and finished it off with a sentiment from the Friendly Greetings sentiment set.

Copics:
skin: E000, E00, E21, R20
hair: E74, E77, E79
hat/apron: R81, R83, R85
dress/socks: Y06, Y15, Y38, YR23
shoes: T5, T7, T9
cake: E21, E23, E25, E27, E29
stool: E53, E55, E57
bear: E31, E33, E35, E37


Thanks for stopping by! 

Thursday, March 2, 2017

Sending Happiness!

Somehow this card never made it on my blog when I shared it on the LDRS Creative blog back in January (pesky blogger)!!

I used one of the *NEW* stamps sets, Outdoor Play by Becky Pearce, from CHA, that are avaialable now for preorder here...

Sending Happiness

I love me some cute critters, and this set is just filled with them! I mean how could you resist cuddly bears & FOXES!? I couldn't help but to color of bear as a sweet panda, don't they look like the cutest bunch of friends headed to the park to play!

I colored and fussy cut out each one to create my playful scene. I diecut some coordinating patterned papers using the Fancy Rectangles & Little Things and a Basic Pierced Ovals for ground and layered them together on the a patterned sunburst paper that is also embossed with the Picnic Quilt embossing folder. I finished off the card by stamping the sentiment (also in the Outdoor Play stamp set) on the 'grass!'

Thanks for stopping by!

Tuesday, February 28, 2017

Daffodil Mice

I'm on the LDRS Creative blog today sharing my latest card...

It's starting to feel more like Spring Here in Arizona, (well except for the bit of rain we're getting today!) and we're getting our garden beds ready to plant, I thought the Daffodil Mice were a cute fit!

Warm Fuzzies

I diecut the image using the square die and part of the flourished frame from the Majestic Frame die set, and added Basic Stitched Flags for the background and the sentiment as well!

Copics
mice: E00, E31, E33, E35, E37, R20
daffodils: Y02, Y11, Y13, Y15, Y17, Y21
watering can: C1, C3, C5
grass: YG03, YG25, G24

Have a fabulous day!

Wednesday, February 15, 2017

Sweet Life

I'm on the LDRS Creative blog today sharing my latest card featuring the All Dressed Up stamp line, Love the Weekend...

Sweet Life

After coloring my image I die cut it using the Fancy Squares & Little Things die set, I squared off the bottom, making it a 4 1/4" card. I used some coordinating patterned papers and also die cut the "buttons" from the same die set. The sentiment is from Friendly Greetings. I finished it off with some sparkle of sequins and Spectrum Noir sparkle on her skirt.

Thanks to a comment on Facebook, I'm also joining in on the All Dressed Up- Anything Goes Challenge! 

Copics
skin: E000, E00, E21, R20
hair: E44, E47, E49, YR23
clothes: RV91, RV93, RV95, W1, W3, W5
dog: C1, C3, E40, E41, E43
table: BG0000, YG21, YG25

Thanks for stopping by!!

Sunday, January 29, 2017

Year of the Rooster!

Happy Chinese New Year!  2017 is the Year of the Rooster- my year!

It wouldn't be new years without some handmade lucky envelopes for my kids, niece's & nephew!

I pulled out my favorite animal set to make these, Lunar Animals & Lunar Extras from Mama Elephant!

Year of the Rooster

I originally intended for them to be much simplier, but it just wouldn't come together for me- so I created this sweet scene!

I used a Pretty Pink Posh Stitched Tag die and stamped the flower branch & rooster, colored with copics. I made the mini envelope using my envelope punch board and layered red glitter paper under the tag. It was still missing *something*... I die cut the flag (basic stitched flag) and stamped & gold embossed the, "Gong Hay Fat Choy" sentiment too look like a traditional New Years banner hanging from the tree branch! I finished them off with another rooster on the back mounted with foam tape so the flap of the envelope tucks under it.

Copics:
Rooster: E23, E25, E27, B37, Y35, R37, R46
branches: E53, E55, E57, RV00, RV02, RV06, YG61, YG63, YG67

Wishing you all a Prosperous & Happy New Year!


Sunday, January 22, 2017

Everything Stops for Walkies!

Hello!

I would have posted this sooner, but having some computer issues at the moment and attempting to blog from my phone...

This weekend kicked off the CHA2017 trade show, here in my hometown of Phoenix, AZ- I so wish I was there! Anyway, I'm popping in today to share one of the cards I made with one of the new releases from LDRS Creative... Everything Stops for Walkies!

It is absolutely the cutest and I had so much fun making this card.

Walkies

Sorry to cut out the details, hope to update as soon my computer is back up and running!

Thanks for stopping by!!

Friday, December 30, 2016

Kick Up Your Heels!

Happy *almost* New Year!!

Can you believe how quickly 2016 has flown by?

BUT before we ring in 2017... I'm sharing a card I made for the LDRS Creative blog today!

I decided this All Dressed Up: Love that Dress stamp, and sentiment from Uptown Sayings was a perfect match for a New Years card!

Kick Up Your Heels...

I colored with copics and die cut using the Fancy Rectangles & Layers die, adhered it to the red glitter paper and fussy cut out along the die cut since I had used the largest rectangle. Added sparkle to the dress and shoes with a glitter and white gel pen, finished off my card by adhering it to my card base with a coordinating blue foil card stock, and red bow!

Copics:
skin: E000, E00, E21, R20, BV00
hair: C3, 100
dress/shoes: B24, B26, B29, R17, R37, R46

Wishing you all a FABULOUS 2017... until next year!

Wednesday, November 30, 2016

North Pole Woods

Hello!

Hope all of you in the US had a wonderful holiday weekend, and everyone else- a fabulous regular weekend! LOL!

I'm sharing a card today over on the LDRS Creative blog that I made combining two of the newest clear stamp sets- North Pole & North Woods!

North Pole Woods

I stamped and masked the polar bear from the North Pole stamp set and then added the trees to the background. Colored in copics, I gave the trees a dusting of snow- it is the North Pole, right? I die cut the scene using a die from the Fancy Squares & Little Things die set, and finished of the image with a bit of sparkle using a Spectrum Noir sparkle pen. I found some coordinating pine tree patterned paper in my stash, along with the polka dots (I thought looked like snowballs!) using the Basic Stitched flag die also from Creative Basics, pulled everything together with a sprinkling of snowflake sequins and baker's twine and added the sentiment using a stamp from the *HSN exclusive* CandiBean Christmas stamp bundle... there's still some available AND they're on sale!!

Copics: 
polar bear: C00, C0, C1, C3
trees: E35, E37, YG03, YG17, YG67, YG97

Thanks for stopping by hope you have a fabulous day!!

Tuesday, November 15, 2016

Thermal Weather

Thermal Weather... but obviously not here, we're still pushing the *almost* 90 degree mark! (but still beautiful weather..I'll take it!)

I'm on the LDRS Creative blog today sharing a card I made using the new, Saturated Canary stamp- Thermal Weather!

Darlin'

I colored her with copics in some rich jewel tones and die cut it using the Fancy Squares and Little Things dies, including the purple mat. I used some coordinating patterned papers and washi tape in addition to a Basic Stitched flag- that is actually two flags adhered together behind the image to make it fit the length of my card. I finished my card by adding the sentiment from the Amazing Girls stamp set.

Copics:
skin: E000, E00, E21, R01;
eyes: G20, G21, G24;
hair: E23, E25, E27, E29;
clothing: RV17, RV19, RV66, RV69, B63, B66, B69, W1, W3, W5

Thanks for stopping by!!

Monday, October 31, 2016

Happy Halloween!!

I'm on the LDRS Creative blog today sharing my LAST Halloween card... this year! Ha!

It's funny because I didn't get into Halloween cards until recently, and now with all the images getting cuter and cuter every year- it's hard to resist!

I decided to play with one of the new Dollhouse images, Oh Deer and transform her into a Halloween-themed image! When looking for ideas for my own costume this year- I kept seeing a trend photos of deer face paint/make up ideas, and photos from all the new "selfie" photo apps that are out now and found my inspiration!

Oh Deer

I colored her with copics and added the bit of brown down the front of her forehead and nose to look like a deer as much as I could! I die cut the stamped image using the Fancy Squares & Little Things die, and also a larger mat from the same die set in purple card stock. Using some coordinating Halloween-themed patterned papers I matted the die cuts to my card base and added a few Basic Stitched Flag dies, the black glitter and spider print strips are washi tape, stamped my sentiment from the Friendly Greetings set, and finished it off with some large gems- what's Halloween without some sparkle, right?

Copics:
skin: E000, E00, E21, E31, E33, R20
hair: 100, C3
antlers: E31, E33
top/scarf: V04, V06, V09, YG03, YG17, YG67

Thanks for stopping by- have a fabulous and SAFE Halloween!

Monday, October 17, 2016

Everyday Winnie

Hello!

I'm on the LDRS Creative blog today sharing a more detail look at some of the cards I made as samples for the HSN show that aired a few weeks ago.

LDRS Creative on HSN

This kit, Everyday Winnie by Polkadoodles,  includes 6 adorable stamps and a 6x6 pad of patterned papers all in a sturdy and coordinating storage box!

My first card is with Winnie's Scrummy Cupcake...

WInnie's Cupcake
After coloring Winnie, I used the Gilded embossing folder for my card base, added some of the patterned papers from the kit- including the banner flag and letters, paired it with a solid coordinating pink card stock mat, I used the Gilded Doily die as an embossing tool, (by running it through my diecut machine using an embossing mat)  on the Basic Stitched Flag banner behind Winnie, she is mounted using foam adhesive for some extra dimension.

Copics
skin: E000, E53, BV00, R20
hair: YR23, C3, 100
clothes: RV0000, RV00, RV02, B91, B93, B95
cupcake/flower: R17, R37, R59, R21, R22, R24, Y21, Y23, RV00, RV02, RV04.

My second card is with Winnie's Rose Garden. She is another favorite because I LOVE roses, and when I looked at her she made me think of Strawberry Shortcake... so that's how I colored her!
Winnie's Rose Garden

I decided to keep this card simple to allow Winnie to take all the focus. I colored her with copics, and kept my layers easy with just a single sheet of the gorgeous rose patterned paper from the kit. I added a few die cut flags to tie in a little more green from the leaves in the image and the paper together. Finished off the image pieces with some faux stitching with a black pen to match the stitching on the stitched flags.

Copics used:
skin: E00, E11, E50, R20
hair: R24, R27, E09, E18
clothing: R20, R21, R22, R24, C1, C3, Y11, Y13, Y15, Y17
scenery: E41, E43, E44, R81, R83, R85, Y11, Y15, N0, N3, N5, R01.

I hope you grab one of these fabulous kits for yourself... there's also 2 other holiday themed sets still available on HSN too- Holiday Winnie and Candi Bean Merry Christmas!

Thanks for stopping by!!

Wednesday, October 5, 2016

LDRS Creative & HSN!

Hi Everyone..

Just a quick post here to share what I was up to through the month of September...

LDRS Creative has release special limited edition stamp kits ONLY available through HSN.com!!

I was crazy busy working to put all projects together to air on the show as samples.. I'll be sharing each one individually soon.. but until then- here's an overall look at all the projects I made

Candi Bean Christmas Critters:


PolkaDoodles Holiday Winnie-Gingerbread Joy:


and this one isn't holiday themed but still SUPER cute!

PolkaDoodles Winnie Sugar Blossom:


GO.. RUN... check them out before they're gone!


Friday, September 30, 2016

North Pole Greetings!

Hello Happy Friday!!

I'm on the LDRS Creative blog today sharing yet ANOTHER card using the sweet penguin from the North Pole stamp set- I just can't get enough of him... I haven't even inked that adorable polar bear yet!

North Pole Greetings

I stamped & masked the Santa hat on the penguin, colored it in my favorite Copic red combo (R17, R37, R89) and gave the penguin a few strokes of gray to his belly for dimension and some rosy cheeks, and fussy cut him out. I also stamped the sign from the set, added the north pole sentiment, and die cut it with the matching die.
To give my card some texture, I die cut 2 squares using Fancy Square die in felt, with one of those squares I die cut again a little hill using one of the Basic Cutting Edge border dies- tucked the north pole sign behind it and the penguin on top.
The Merry Christmas sentiment is from a special set that will be available *only* on HSN starting October 5th! Stay tuned for more info on that...
To put my card together- I layered my felt scene with a Basic Stitched flag die cut and adhered everything to my card base, with this fun festive patterned paper (from Hobby Lobby).
Thanks for stopping by... I'll be back shortly with another share! :) 

Thursday, September 29, 2016

Chilly Daze

Hello!  I'm over on the Passionate Paper Creations blog today sharing yet another stamp from the new LDRS Creative release... I'm having so much fun with these stamps & dies!

For my card today, I used Chilly Daze, just love her wreath of fall leaves on her head...

BeYOUtiful

I colored her with Copic markers, die cut the image using the Fancy Rectangle and Layers die set. I also die cut some coordinating papers using the same size die and matted them off center for more interest against the (Picnic Quilt) embossed background. The sentiment is from the Summer Fun and die cut from a tag in the same rectangle die set. I found the leaf sequin in my stash and added a few more for some extra sparkle! 

Copics
skin: E000, E00, E11, E21, R20
eyes: G21, G24
hair: E44, E47, E49, YR23
clothes: B24, B26, B29, R46, R59, R89, W1, W3, W5; (shimmer on scarf- Spectrum Noir sparkle clear pen.) 
leaves: BG72. BG75, G94, G99, R39, Y02, Y15, Y17, YG03, YG17, YR14, YR16
background; C0, C1, C3, 0

Thanks so much for stopping by.. be back soon with more to share! 

Tuesday, September 27, 2016

Day 2 LDRS Creative Release

Hello!

I'm back again to share another card I created for day 2 of the LDRS Creative release!

Today, I used the North Pole stamp set along with Creative Basics dies. Check out all the new *stamps* and *dies*...

Penguin Joy

I used the sweet little penguin from the set, stamped it twice and added some eyelashes to make one a girl penguin ;)!

This stamp set also comes with the matching die set, which I also used to die cut the penguin couple... I lined up the die with the first penguin and taped it down, ran it through my Big Shot- by placing it to the edge of the cutting plates so the point where the penguin wings met hangs off the edge and doesn't get cut, then did the same thing for the other penguin, and carefully using my x-acto blade finished off the cuts.  I gave them a few strokes of gray copic around their bellies and some rosy cheeks. I die cut a few Basic Pierced Ovals and layered them to look like snowy hills and die cut them all together using the Fancy Rectangles & Layers die, mounted it on some coordinating patterned paper and washi tape background, added some bakers twine a few sparkly accents and called it done!

Copics: 
bellies: C00, C1, C3, 0
cheeks: R00

Don't forget to go to the LDRS Creative blog for more fabulous inspiration and chances to win! AND for even more chances to win- check out the Passionate Paper Creations & Friends Facebook group!

There's even a sale going on... 20% off the ENTIRE SHOP... this week only!!

Monday, September 26, 2016

LDRS Creative *NEW* Release!

Hello!

Super excited to share today... there's a NEW release happening over at LDRS Creative! There are NINE new products and everything is available in the shop right now!!


For my first card (come back tomorrow to see more!) I used this adorable Nesting stamp.

Nesting

After coloring with copics, I fussy cut her out, die cut a few Basic Stitched Flags, and used the NEW Peaceful Dove Edge die as an embosser to create my background (I added a few strokes of copic to make it stand out a bit more).  The sentiment is also from a new Christmas stamp set to be released soon- They're going to be featured on the Home Shopping Network on October 5th, and *only* available there... stay tuned for more details!

Copics:
skin: E000, E00, E11, E21, R20
hair: C3, 100
nest/birds: E53, E55, E57, YG17; B05, G05, B37; R37
scarf/sweater: R46, R59, R89, Y17, Y26, Y28; W3, W5, W7

Be sure to head over the LDRS Creative blog, and leave a comment for your chance to win a $25 gift certificate to the shop and to see some seriously awesome inspiration from the rest of my teammates!

AND we're also celebrating the release over on the Passionate Paper Creations & Friends Facebook group- so be sure to join (if you're not already a member) and play along! I hear there are more prizes to be won there too!

Thanks for stopping by!

Thursday, September 15, 2016

Blossom Girls

Hello!

I'm back on the LDRS Creative blog today sharing my latest project! I had been dying to color these sweet Blossom Girls since I first got them back in July and finally got the chance to now... BUT I couldn't decide on which one to use first, so what did I do???

I used all FOUR of course!!

Blossom Girls box 1

Blossom Girls box 2

I remembered having the template for this trapezoid box waaay back when- from an old Paper Crafts magazine.. dug it out and with some trial & error remembered how to make it again!

I colored each of the girls in their own style, but kept a similar color scheme overall... Each girl is also mounted with foam tape on top of a Stitched Flag die cut from Creative Basics. I also added a sentiment below each girl from this Amazing Girls sentiment set. And finally, added a thin wavy border (from this die cut) along with some lacy trim to finish off the top.

Here's a close up of each of the girls, along with the copic colors I used for each...

Jasmine:
Jasmine

skin: E000, E00, E11, R01, R22; hair: C3, 100; eyes, E35; clothes: BG11, BG13, BG15, Y06, Y15, Y38, W3, W5; purse: RV14, RV17, RV19, W3, W5

Blossom:
Blossom

skin: E00, E93, V12, R22; hair: E35, E37, E39, E29; eyes: E23; clothes: RV14, RV17, RV19

Daphne:
Daphne


skin: E000, E00, E21, R20, R22; hair: E25, E27, E29, YR23; eyes G21, G24; clothes: BG11, BG13, Y06, Y15, Y38, YR23, W3, W5; flowers: C0, C1, Y06, Y15.

Daisy:
Daisy

skin: E11, E33, E51, R22; hair: E44, E47, N9, YR23; eyes: B01, B05; clothes: BG10, BG11, BG13, BG15, RV14, RV17, RV19; Y06, Y15.

Thanks for stopping by!

Wednesday, August 31, 2016

Warm Fuzzies

Happy hump day!

I'm on the LDRS Creative blog today, sharing another Saturated Canary image, Crafty Cat!

Crafty Cat

I had so much fun putting this one together- I'm a big fan of layers and this one has plenty!

My stamped image was die cut using Fancy Squares and Little Things, but since I had stamped and colored this awhile ago- it was too close to the bottom of the page to fit the full square die, so a bit of the bottom is cut off! The sentiment is from the Summer Fun sentiment set, I mounted that on a coordinating patterned paper, then die cut the yellow flag using the Stitched Banner die to place under that layer. Added all of that onto the card base and finished it off by tying the button dies from the Fancy Squares and Little Things die set with some jute twine.

Copics:
skin: E000, E50, E21, R00
hair: E29, C7, C9
shirt: BG11, BG13, BG15, BG18
cat: W0, W1, W3, W5
table: E31, E33
pencil/markers: Y38, N1, N3, R14


Thanks for stopping by!