Hello & Happy Monday!
It was my turn again over on InStyle Stamps to host Method Monday! This week I chose to make this super cute teabag holder I saw here. It makes a great little gift or even a sweet invitation to have your best buds over for some tea!
So here we go!
Supplies:
- 5″x 11″ cardstock
- 2.25″ x 11″ strip of patterned paper
- 2- 3.25″ square pieces patterned paper
- Strips of cardstock for border punches
- Border punch (I used one from Martha Stewart)
- Adhesive
- String
- Colored image

Step 1: Score 5″ x 11″ cardstock along the long side at: 3.5″ and 3.75″ from both sides.

Step 2: Adhere patterned paper to bottom edge.

Step 3: Punch border from strip of cardstock.

Step 4: Adhere to top edge of patterned paper.

Step 5: Add border punch on 3.25″ squares.
(Note: you can alter these squares to fit the size of the tea bag)

Step 6: Adhere to inside on middle and right panels.

Step 7: Insert teabags.

Step 8: To close, fold right panel in towards center.

Step 9: Tie closed with string & decorate! I used Sitting Ava, she’s just the perfect fit to sit along the top of the patterned paper!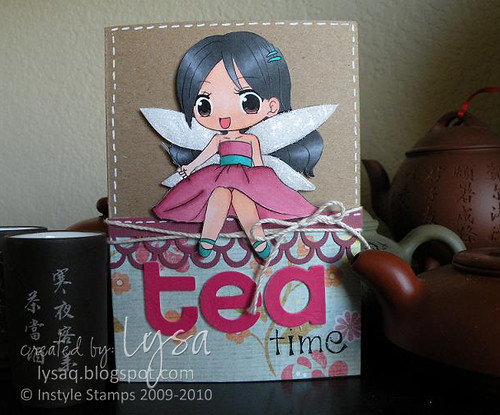
Going along with the paper-piecing theme from my previous post- I printed to Ava's and layered her dress to add some dimension- you can see it here if you look closely :)

Be sure to check out the InStyle Stamps store- there's a SUPER SALE going on!! Selected digis are only $1 and Stamps are $3!!! Go check it out!!!!
Thanks for coming by and happy shopping! :)


Step 4: Adhere to top edge of patterned paper.

Step 5: Add border punch on 3.25″ squares.
(Note: you can alter these squares to fit the size of the tea bag)

Step 6: Adhere to inside on middle and right panels.

Step 7: Insert teabags.

Step 8: To close, fold right panel in towards center.

Step 9: Tie closed with string & decorate! I used Sitting Ava, she’s just the perfect fit to sit along the top of the patterned paper!
Going along with the paper-piecing theme from my previous post- I printed to Ava's and layered her dress to add some dimension- you can see it here if you look closely :)
Be sure to check out the InStyle Stamps store- there's a SUPER SALE going on!! Selected digis are only $1 and Stamps are $3!!! Go check it out!!!!
Thanks for coming by and happy shopping! :)
Ohhh!! Awesome idea. I love that MS punch ... oh no, I think I actually NEED that MS punch! (You're such an enabler!) :)
ReplyDeleteLove your coloring of Ava also! So very pretty. Great job on MM! hugz, Mary
Awesome idea!!! love that MS border punch..have to get one. Fabulous coloring as always.
ReplyDeleteHgs
Piali
Great Tutorial Lysa. Nice and easy to follow. Thanks for the sale update... will be getting some of the digi stuff tonight
ReplyDeletethis is so sweet! thanks for the tutorial!
ReplyDeleteAwesome idea and Ava is too cute, Lysa!! Love it!!
ReplyDeleteThanks for the inspiration!
ReplyDeleteSo creative & cute! Thanks for sharing.
ReplyDeleteSo Cute Lysa...I just made one similar to this...yours is so CUTE!!
ReplyDeleteI just LOVE how you color those girls....
I love tea! This is such a great card - I'm going to make one for my mom!!! Thanks for all the inspiration!
ReplyDeletethis card is just gorgeous.
ReplyDelete