Friday, October 30, 2009

It's Blog Hop Time!

Hiya! Happy Friday!!

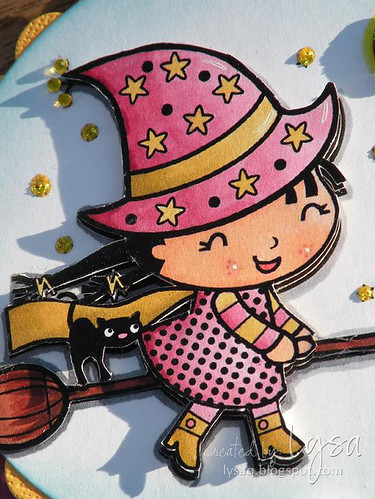
I can't believe how fast the past month has gone by and that Halloween is tomorrow!! Anyone have any big plans? We've finally hit Fall weather here in Arizona.. it's supposed to be beautiful 70 degrees today.

Now onto what you came here for - the InStyle Stamps Blog Hop! If you didn't come here from Maylee's blog, be sure to go back here to start from the beginning and hop along to thru all of the fabulous design team's projects! Don't forget to vote for your favorite projects for a chance to win a prize too!!

In case you get sidetracked, here is the order of the hop:
Kim
Piali
Joy
Virginia
Raquel
Mary
Maylee
Lysa -- You are here!
Melissa

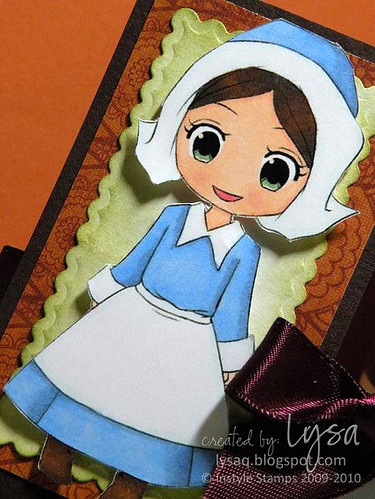
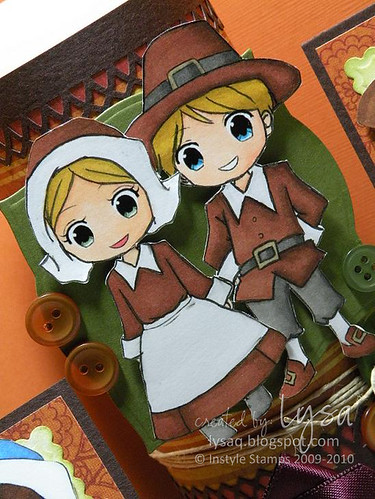
This month's theme is set the table, so I decided to use these super cute Pilgrim images, William & Virginia (available here) to make placecards and to decorate a candle.
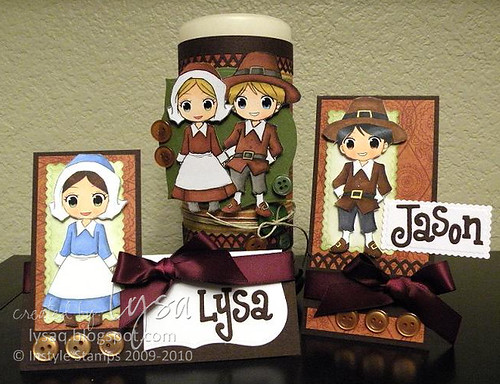
Blog Hop

Virginia
William

Blonde Virginia & William
Supplies:
- William; Virginia (InStyle Stamps)
- Labels 1 & 3; Long rectangle nestiabilties
- Lattice border punch (Martha Stewart)
- Ink: Copic Markers
- Other: ribbon, twine, buttons

Thanks for stopping by! Now hop on over to Melissa's blog and check out what she did!

Thursday, October 22, 2009

Happy Happy Birthday...

to my sister!! Today is one (I have 3) of my sister's birthday!

I wanted to give her the card before I posted it here, and we just got back from dinner not too long ago! I used this new (stinkin' cute) digi image from Pink Cat Studio. I love to bake and my sister enjoys cooking- so I thought this image was just perfect for her :)
PCS Bitty Betty
Itty Bitty Betty
Supplies:
- Itty Bitty Betty Baked a Pie (Pink Cat Studio)
- Tools: Labels 3 nestabilities, Loop border punch (Martha Stewart)
- Copic Markers
- Patterned Paper (My Mind's Eye- Pretty Please)
- Other: buttons, ribbon, string, gems

Happy Birthday Sis- I Luv Ya!

Thanks for stopping in!

Like Toad-ally Awesome!

You're just like toad-ally awesome dude.. sorry I couldn't resist!

I just bought the Labels #3 set of nestabilities from Hobby Lobby- and am lovin' it- I finally ordered Labels 1 too! (thanks to some total arm twisting enabling from a certain sister!)

Anyway, I really wanted to "play" with my new toy and had this soon to be digi toad from InStyle Stamps all colored & ready! I made this card 4"x4" and off set the sentiment portion to hang off a bit- I'm diggin' how it turned out!
ISS Toad-ally Awesome
I also cut and layered the toad and lilypad for some added dimension too.
ISS Toad
Supplies:
- Toad & sentiment (InStyle Stamps)
- Labels 3 nestabilities
- Copic Markers
- Other: Ribbon, twine, buttons

The SALE is still going on at InStyle Stamps- be sure to check them out before it's over!!
TFL!!

Saturday, October 17, 2009

Hanging 3D Ornaments

Happy Weekend to you!

I am proud to say that I've held off making my first holiday card... til October! I can't believe how fast time is flying by! ;P

When I saw the challenge over at Hero Arts, I got this idea and just had to try it! Melissa had done something similar awhile back and I had filed it way back in my brain to try it- & it worked! (though I'm more shocked that I actually remembered it!)
Hanging Ornaments

I stamped DB Dots & Flowers on green & blue card stock, punched out circles (3 for each ornament), folded each circle in half and adhered them together, added some metallic dots from Hero Arts and Voila! 3D ornaments!
Ornaments
Supplies:
- DB Dots & Flowers; Let it Snow (Hero Arts)
- Snowflake border punch (EK Success)
- Snowflake embossing folder
- Other supplies: white gel pen, metallic dots, string, ribbon, buttons

Thanks for coming by- have a great weekend!

Thursday, October 15, 2009

Under the Sea!

"Darlin' it's better down where it's wetter, take it from me!.... Under the Sea!"

Ok.. sorry I couldn't resist. I loved watching The Little Mermaid growing up- and now get to 're-live' that watching it with my nieces over and over and over again! I colored Mermaid Anya from The Greeting Farm to look like Ariel with her red hair & purple seashells...

Coincidentally Stamptacular Sunday Challenge is having a "character counts" challenge this week. The challenge was to make a card that had a well-known cartoon character on it- while I thought I could pull out some of my other cartoon stamps I have, I thought this would be more fun!
Under the Sea
Supplies:
- Mermaid Anya (The Greeting Farm)
- Scalloped circle nestabilities
- Double Loop border punch (Martha Stewart)
-
D'vine Swirls embossing folder
- Prima flowers
- Copic markers
- Other: buttons, white gel pen, Stickles, pearl gems, ribbon


Thanks for stopping in!

Wednesday, October 14, 2009

YNS Pink & Yellow

Hello!

Happy "hump day"! It's been a long week already- and I can't wait for the weekend to be here! Would love to have more time to be crafty! I'm excited to share with you this card I made for Your Next Stamp's FIRST ever challenge.

The challenge was to use pink & yellow- not my normal color combination- so it was definitely a challenge! I don't have any YNS stamps (yet) but definitely will be picking up some more very soon. In the meantime, YNS has some digis available for a limited time- and for those like me that "need" the instant gratification of something new!

On to the card- I downloaded this super cute witch, colored her with copics and made a tent topper card. The card base is a 4.25" square, and the scalloped circle sits slightly off the top to make it 5.5" tall.
Your Next Stamp Witch
YNS witch
Supplies:
- Cute Witch (Your Next Stamp)
- Scallop/Circle nestabilities
- Swiss Dot embossing folder
- Lattice border punch (Martha Stewart)
- Other: ribbon, buttons, Stickles, gems, Copic markers

Isn't she the cutest? Thanks for stopping by!

Monday, October 12, 2009

Tea Time!

Hello & Happy Monday!

It was my turn again over on InStyle Stamps to host Method Monday! This week I chose to make this super cute teabag holder I saw here. It makes a great little gift or even a sweet invitation to have your best buds over for some tea!

So here we go!
Supplies:
- 5″x 11″ cardstock
- 2.25″ x 11″ strip of patterned paper
- 2- 3.25″ square pieces patterned paper
- Strips of cardstock for border punches
- Border punch (I used one from Martha Stewart)
- Adhesive
- String
- Colored image


Step 1: Score 5″ x 11″ cardstock along the long side at: 3.5″ and 3.75″ from both sides.

Step 2: Adhere patterned paper to bottom edge.

Step 3: Punch border from strip of cardstock.

Step 4: Adhere to top edge of patterned paper.

Step 5: Add border punch on 3.25″ squares.
(Note: you can alter these squares to fit the size of the tea bag)

Step 6: Adhere to inside on middle and right panels.

Step 7: Insert teabags.

Step 8: To close, fold right panel in towards center.

Step 9: Tie closed with string & decorate! I used Sitting Ava, she’s just the perfect fit to sit along the top of the patterned paper!Tea Time!

Going along with the paper-piecing theme from my previous post- I printed to Ava's and layered her dress to add some dimension- you can see it here if you look closely :)
Ava up close

Be sure to check out the InStyle Stamps store- there's a SUPER SALE going on!! Selected digis are only $1 and Stamps are $3!!! Go check it out!!!!

Thanks for coming by and happy shopping! :)


Sunday, October 11, 2009

Paper Piecing fun!

Hi! Hope you are all enjoying your weekends! It's finally cooling down here in AZ, I'm sitting here on this beautiful Sunday afternoon with my windows & doors open enjoying the fresh air :)

I finally had some time to participate in the paper piecing Hero Arts challenge this week! I've had this new cling stamp sitting on my desk begging to be inked... She's just so cute, I'll be using her more for sure!!

I stamped her on origami paper, but wiped away the ink from the flowers that are on the her top before stamping- wanted to show off the cute pattern on the paper. I made a gatefold card with my trusty Scor-pal.
Cute girl- gatefold card


Supplies:
- Friends, DB Dots & Flowers, Birthday Sayings (Hero Arts)
-
Tag trio nestabilities (Spellbinders)
- Other: ribbon, buttons, Copic Markers

Thanks for stopping in & have a wonderful Sunday!

Friday, October 9, 2009

Stylin' Sasha!

Back again with another card to share with you! This time, I have Sasha from InStyle Stamps to show off for you- She is a sweetie pie and is Stylin' with her sweet hair do and sleek dress!

I have completely flipped for digi images, I love that I can print them any size I want to fit my projects- possibilities are endless!
Stylin' Sasha!

Supplies:
- Sasha (InStyle Stamps)
-
Long Rectangle Nestabilities (Spellbinders)
- Double Loop edge punch (Martha Stewart)
- Patterned Paper (My Mind's Eye Bloom & Grow collection)
- Prima flowers
- Other: pearl gems, buttons, ribbon, Copic markers


Be sure to check out InStyle Stamps in the coming months- tons of new images are in the works!

Thanks for stopping in & have a fabulous weekend!

Thursday, October 8, 2009

Ruffles & Witches!

I had so much fun with the Retro Witch from InStyle Stamps in my previous post that I just had to make another card!

Dawn McVey made a card recently with this ribbon treatment & I wanted to try it for myself! The ribbons I had within arm's reach were orange & purple so that determined my color theme :) This card also fits well with the ribbon challenge over at Caardvarks too! (It was just meant to be- LOL)


Supplies:
- Retro Witch (InStyle Stamps)
- Spiderweb border punch (Martha Stewart)
- Ribbon, Stickles, gems
- Copic Markers

Thanks for popping in!

Saturday, October 3, 2009

WCMD: Best Witches!

Hello & Happy World Card Making Day!!

I just had to participate in WCMD with this adorable Retro Witch from InStyle Stamps! I can't help myself from calling her "Samantha" from the show 'Bewitched' after my sister mentioned it her post a few days ago!

I made this card for the Pink Elephant challenge #34, the rules were to create something with Dots, Punches, & a Tag. I used some orange dot paper for the background, Cuttlebug slider tag die cut with the printed "Best Witches" sentiment, and searched all of my Michaels before I finally tracked down the spiderweb border punch from Martha Stewart!

(if you click on the picture, you can see up close that I also added black diamond stickles to the spiderweb & used a clear spica glitter pen on her green dress)


Supplies:
- Retro Witch (
InStyle Stamps)
- Patterned Paper (
Lasting Impressions, K&Company)
- Scalloped rectangle nestabilities (Spellbinders)

- Spiderweb border punch (Martha Stewart)
- Slider tag diecut (Cuttlebug)
- Ribbon, twine, buttons, gems
- Copic markers & Spica pen

Thanks for stopping in & I hope YOU find time to participate in World Card Making Day!